Pages

Thursday, April 25, 2019

3D Class S2 Week 030 Vehicle Part 4 - Getting the Normandy into UE4

S2 Week 030 Vehicle Part 4 - Getting the Normandy into UE4

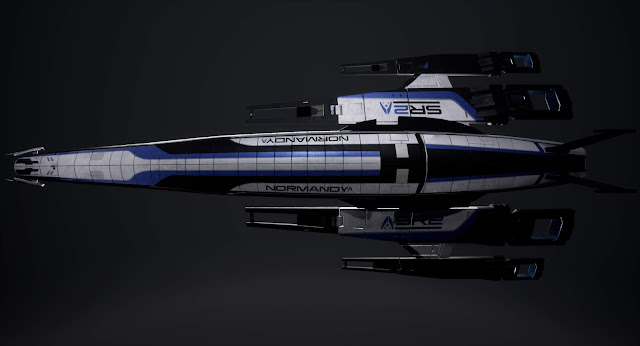
   BEHOLD - THE FRUITS OF MY LABORS!


 I'm so incredibly happy with how this turned out. I wouldn't say this was the hardest project for me to date, but the challenge was still high, and I wanted to really push myself. My goal was to replicate this ship as best as I could, down to the shape and paint job. As I was getting ready to capture my beauty shots, a thought came to me that, the more I thought it over, the more I was convinced it was feasible. I'd done a space skybox before, in my second RPP in the first semester. Why not put the Normandy in space, and see what I could do?
   Lighting is still a struggle for me - in that it requires a lot of time and effort and tweaking. I made sure to set up my beauty shots before tackling my space idea, but once I was happy with that, the lighting setup served as a good base for my shots above. Speaking of beauty shots, here they are - 


   And voila! There goes another project completed. I very much plan on revisiting this piece after I've received feedback, because I would most definitely like to make this a portfolio peace.

See ya next project!


Monday, April 22, 2019

3D Class S2 Week 029 Vehicle Part 3 - Texturing the Normandy

S2 Week 029 Vehicle Part 3 - Texturing the Normandy

   So this week was dedicated to readying the pieces of the Normandy for baking in Substance Painter, and, you guessed it, painting this girl all nice and pretty. My goal was to replicate the paint job from the original game as best I could in terms of colors and decals, but clean up the look to today's fidelity as opposed to graphics seven years ago. I still have a bit more to do in terms of fine detail, but I believe a majority of the paint job is there. I'm going to keep pushing this over the next couple days, and put her in engine.


  I'm pretty happy with her all in all. It was a lot of work and an incredible amount of meticulous scrutiny over a ship I spent mostly playing inside of, rather than admiring from the outside. With that being said, I haven't minded in the slightest ^_^

Monday, April 15, 2019

3D Class S2 Week 028 Vehicle Part 2 - Modeling the Normandy and setting up the High Res

S2 Week 028 Vehicle Part 2 - Modeling the Normandy and setting up the High Res

  This week I focused on finalizing finer details that exist on the ship, such as the little top fin in the front, and the center groove that runs around the entire ship. I cleaned up what I could, but there came a certain time where I needed to give myself time to set up for exporting the pieces to ZBrush for polish. It was then I went to town with edge loops and the multicut tool. Once I was able to switch to smooth mesh preview and back to normal preview without a great surface change, I worked on exporting each piece and importing to ZBrush. When everything was assembled into a project, I got to work adding polish and touch up to get smooth and clean surfaces.


  With polish done, I'd like to loop back to the low poly and retopo those engines really quick (heheheh, I too know the absurdity of that feat), to get the poly count down some. Currently each engine is broken up into three parts, so it's possible I could get it down some, because I don't think 44k is going to cut it. With that in mind, I have all the pieces just about ready to go into Substance Painter for the bake and texture job.

Until next time!


Monday, April 8, 2019

3D Class S2 Week 027 Vehicle Part 1 - Modeling the Normandy SR-2

S2 Week 027 Vehicle Part 1 - Modeling the Normandy SR-2

   For our final project for the semester, what better way to end off the semester than modeling a neato space ship from one of my favorite video game franchises? For this project I have chosen the Normandy SR-2, which (spoilers) has been an incredible challenge. I'm actually not too hung up on the conflicting resources I've come to gather, be it concept art, fan recreations or actual in-game stills. You may be asking yourself, "But Sam, just get images from the games. No biggie." And to that I agree, but getting really good images of all angles of the ship is hard to come by. So with my accrued pool of references, I've been doing my best to remain faithful to the actual ship, while keeping in mine that I'd like to give this near decade old ship a fresh coat of paint. (Yes, yes I know the original Mass Effect came out in 2007, but that Normandy was the SR-1, which is a smaller ship of a slightly different design. The SR-2 was introduced in Mass Effect 2, which released in 2010.) *someone in the distance* NEEEERRRRRRRRRDDDDDDDD! 


  I tried to get as much done as I could this past week, and besides some small details and a good pass at clean up, I think I got the bulk of it done. Here's the progress I made -


Next week the high and low poly should be complete! 

Tuesday, April 2, 2019

DECLARATION - SAMANTHA VAS NORMANDY

Yes for my next project I will be tackling the Normandy SR-2 from the Mass Effect series


Wish me luck!

Monday, April 1, 2019

3D Class S2 Week 026 Texturing and Exporting to UE4 for Organic Sculpt Part 4

S2 Week 026 Texturing and Exporting to UE4 for Organic Sculpt Part 4


   Onto the final stretch, I made corrections to my mesh and redid the bake for the sculpt to kick off the texturing process. This has been the most complicated paint job I've done to date; having to really break down the work that the original artist Jordu Schell did, and determine the layers he laid down. I tried to emulate the details he had on his sculpt, and honestly it was a fun and exciting challenge. Over the course of two days, I took one to lay down the base colors and preliminary washes, and on the second day, I spent 6 straight hours laying down details. Looking back, I'm simply at awe at the amount of work this task required. Without further ado, this is the paint job I accomplished.


   From here, I exported my textures and started up UE4, bring over my mesh and textures. I created the material with controls and then a material instance to tweak the roughness and color values. Once I was content with the material adjustments, I set up a three point light system, all the while testing out a new backdrop setting. As usual, lighting my subject was a painfully arduous task, but a necessary evil to tackle. And with that, here are the final renders of my sculpt in UE4.


(Original Sculpt Reference - Artist Jordu Schell)


All in all, I learned so much from this project. And surprisingly, no crazy issues of note this time around. Maybe I'm finally getting the hang of this art business then ;)
Onto the next project!